Rust isn’t just unsightly; it’s destructive. It weakens metal structurally, turning solid iron brittle and pitted. Threads can seize solid, and moving parts that should slide or rotate simply won’t. A rusty tool isn’t just ugly; it often doesn’t work properly, or at all. Keeping metal rust-free means it lasts longer and functions better. If wire brushes and chemical removers aren’t cutting it, try rust removal using electrolysis. This technique uses a low-voltage electrical current to reverse the oxidation process that created rust in the first place. Instead of scrubbing or dissolving the corrosion away, you’re essentially asking chemistry to run backwards – the rust migrates off your iron or steel and onto a sacrificial piece of metal in a water bath. Electrolysis gets into crevices and threads you can’t reach, won’t damage thin or delicate metal, and tackles heavy corrosion that would otherwise take hours of manual work. The setup is cheap, the materials are reusable, and if you’ve ever found an old tool or car part that looked beyond saving, this might be the method for you.
Supplies/materials
-

- Soda crystals
-

- Water
Tools/equipment
-

- Car battery charger
-

- Bucket/plastic container
-

- Wires and crocodile clips
Remove rust quickly using electrolysis
Here's a breakdown of how electrolysis for rust removal works.
1
- Pick a plastic container the right size to submerge the item(s) you’re removing rust from.
- Find some metal that will be used as your anode. The anode is where the rust will migrate to, so find something you won’t want to use afterwards. Any piece of scrap steel or iron is fine; people often use rebar or an off-cut of sheet metal.
- Place the anode in the container so the top is above your maximum water level line. It needs to be suspended in the water in a way that won’t touch your rusty item. You can wedge it into place or clamp it if you’re worried about it moving.
2
- You need a way to easily lift your rusty object in and out of the water (ensuring it doesn’t touch the anode once it’s in position). A common way is to wrap some wire around the object and then around a piece of wood that sits across the top of the container.
- The negative (black) terminal of the charger will connect to this wire or directly to the object with crocodile clips. How you make this connection does depend on your object, but either way you might need to scrape off any loose rust to get a good contact with clean metal.
- Prepare these elements but don’t connect any wires to your charger.
3
- Fill your container with water and add soda crystals (sodium carbonate) at roughly one tablespoon per litre. This turns the water into an electrolyte that conducts electricity.
- Place your rusty object in the water, ensuring it is well attached to the wire that comes out of the water (around your piece of wood, for example).
- Clamp the positive (red) terminal of your battery charger to your sacrificial anode.
- Clamp the negative (black) terminal of your battery charger to your rusty object.
4
- Plug the battery charger in and turn on the power supply. You should see bubbles forming immediately on both pieces of metal. If nothing happens, check your connections.
- Leave it running. Light rust might lift in an hour, whereas heavy corrosion can take overnight or longer. Check periodically and brush off any loose rust that’s formed a black coating on the surface.
- When done, disconnect the power, remove the item, and scrub off the remaining residue with a brush. Rinse, dry thoroughly, and finish off with steel wool. Apply oil or paint immediately to prevent flash rusting.
Notes about rust removal with electrolysis
The anode and rusty object should be a few centimetres apart.
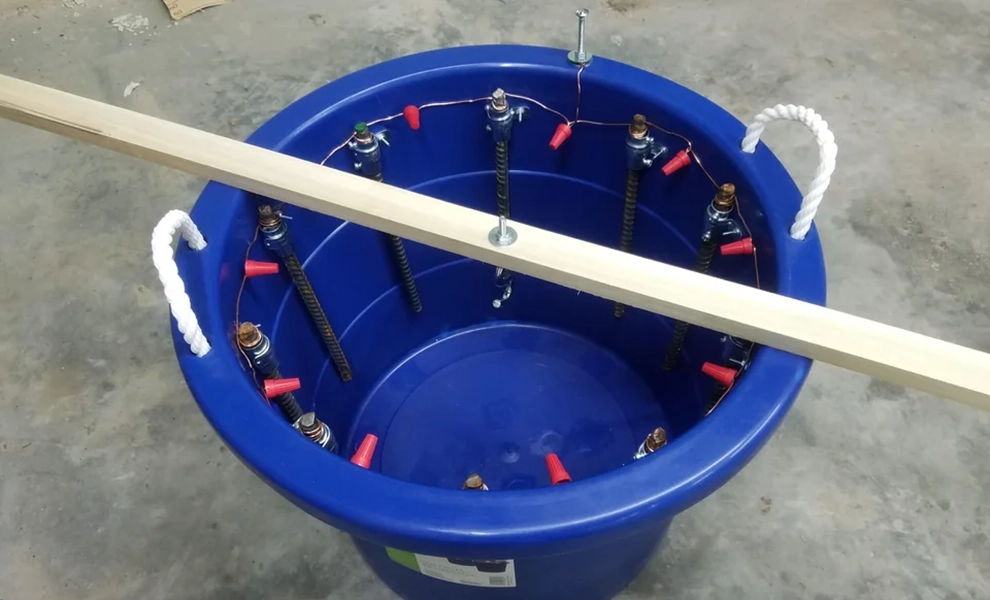
For better results, add more anodes to your setup. Ideally you want anodes positioned so the rusty object has a good ‘line of sight’ to an anode surface from multiple angles, especially if it has complex shapes or recesses or is large. This will also make the process quicker. Place anodes around the edge of your container and connect them to each other with wire – connect each one to its neighbouring anode, but don’t worry about connecting the last one to the first one. You’ll clamp your battery charger onto the first of these, and they will function as a single larger anode surrounding the object.
Electrolysis is a fairly safe process, but remember you’re working with electricity near water. Keep your battery charger away from the tub of water, ensure connections are secure, and switch off at the mains when not using. While electrolysis produces only small volumes of gas, do this in a space with ventilation.
During electrolysis, a black layer of magnetite forms on the surface of your rusty object. Brushing this off periodically allows the process to continue working on the rust underneath. If you leave it, it acts as a barrier and slows everything down.
Clean metal exposed to air will start rusting again almost immediately – this fast-appearing surface rust is called ‘flash rust’. Once you’ve removed your item and rinsed it, dry it thoroughly and apply oil or paint straight away to avoid flash rusting. Don’t leave it sitting around.
Frequently asked questions (FAQ)
Is stainless steel a good material for the sacrificial anode?
No, stainless steel is not suitable as an anode. Stainless steel contains chromium, which forms hexavalent chromium compounds during electrolysis. These are toxic and carcinogenic, contaminating your electrolyte and potentially creating hazardous fumes. Always use plain mild steel, iron, or rebar for your anode.
Sacrificial anodes corrode and pit as they accumulate the migrated rust, eventually becoming too degraded to work effectively. Check them periodically and replace when needed.
What type of power supply works best for electrolysis?
This how-to uses an old car battery charger. A 12-volt car battery charger is ideal for most applications because it provides consistent DC power at a safe voltage and usually has enough current capacity (2 to 10 amps) to work efficiently. You can also use any DC power supply rated between 6 and 24 volts. Lower voltages (6V) work more slowly but are very safe; higher voltages (18 to 24V) work faster but produce more heat and hydrogen gas. Avoid anything above 24V, as the safety risks increase. The current capacity matters too – a small phone charger at 1 amp will work but slowly, whereas a power supply capable of 5 to 10 amps will be noticeably faster. Make sure whatever you use is designed for continuous operation, not something that will overheat after 20 minutes.
Can salt or baking soda be used to create the electrolyte solution?
No, don’t use salt. It produces chlorine gas during electrolysis, which is toxic. You’ll also get hypochlorous acid forming in the solution, which corrodes everything faster—including the item you’re trying to save.
Salt conducts electricity well, which is probably why some people think it’s a good idea, but soda crystals (sodium carbonate – known as ‘washing soda’ in the USA) do the same job without the hazardous chemistry. It’s cheap, available at most supermarkets in the cleaning aisle, and doesn’t produce anything dangerous.
Baking soda (bicarbonate of soda/sodium bicarbonate) does work in an electrolyte solution but is less effective than soda crystals (sodium carbonate), so you will need to use more of it, and the process will be slower. It’s not dangerous like salt is, just not optimal.
How long does electrolysis take for typical rust removal?
There’s no single answer because it depends on several factors working together. Light surface rust on a small tool might be gone in two to three hours. A heavily corroded spanner with thick, flaking rust could take 12 to 24 hours. Very severe corrosion – the kind where the rust is nearly as thick as the metal underneath – might need 48 hours or more. The speed depends on your voltage (higher voltage means faster electrolysis), the surface area of your anode relative to the workpiece, how concentrated your electrolyte is, and the temperature of the water. You’ll need to check periodically and brush off the black coating that forms, which also affects the timeline.
Can electrolyte solution be reused? When should it be disposed of?
You can reuse electrolyte multiple times. The solution remains effective until either the soda crystals are depleted or it becomes too contaminated with rust particles. You’ll notice it’s depleting when the process slows down significantly despite good connections and adequate voltage (that means the conductivity has dropped and you need to add more soda crystals). The rust contamination shows as a brown, murky solution with sediment at the bottom. This doesn’t stop it working, but eventually the solution becomes unpleasant to work with, and you’re better off starting fresh. There’s no fixed number of uses; it all depends on how much rust you’re removing each time.
You can dispose of spent electrolyte solution down the drain in small quantities or let it settle and pour off the clearer liquid. Don’t pour it on your garden, as the iron content isn’t helpful for most plants.
Can electrolysis remove rust from chrome plating or aluminium?
Electrolysis will strip chrome plating from the underlying metal, along with any rust. The process doesn’t discriminate between rust and other surface layers. If you have a chrome-plated item with rust and you want to preserve the chrome finish, this isn’t the method to use. If the chrome is already failing and you plan to refinish the piece anyway, electrolysis will remove both the rust and the remaining chrome effectively.
Electrolysis is only for ferrous metals like iron and steel. Aluminium will be damaged by the alkaline solution, and the process won’t work anyway. The same goes for brass, copper, and other non-ferrous metals.
Does electrolysis work on cast iron cookware, and are there any special considerations?
Yes, electrolysis works exceptionally well on cast iron and is often the preferred method for restoring old skillets and pans because it removes rust without abrading or damaging the base metal. The process will also strip any seasoning along with the rust, so you’ll be starting from bare metal. After electrolysis, you’ll need to dry the pan immediately and thoroughly, then re-season it properly before use. Cast iron is particularly prone to flash rusting, so don’t delay between cleaning and either seasoning or oiling.
Why does rust come back so quickly even though the object was perfectly clean?
When a metal surface has been cleaned or cut, it is exposed to air. This contact with moisture and oxygen results in instantaneous oxidation, which is mainly composed of iron hydroxide and manifests as a reddish or orange-coloured surface rust layer. Known as flash rusting, this phenomenon can appear in a matter of minutes or hours (sometimes you can actually see it happen).
The metal you’ve just cleaned is actually more reactive than it was before because you’ve removed all surface layers and contaminants, leaving fresh, clean iron that’s eager to bond with oxygen. As soon as you’ve rinsed and dried the de-rusted item, give it a protective coating. Oil (machine oil, WD-40, or even cooking oil) provides some protection but may need to be reapplied regularly. Grease provides a thicker, longer-lasting barrier than oil, though it’s messier to apply. For permanent protection, apply paint or a rust inhibitor. What you apply should match the item’s intended use and normal operating condition.
If you’re not ready to finish the piece, keep it submerged in clean water or coat it heavily with oil until you are. Don’t leave cleaned metal sitting bare for any length of time.
Can heavily pitted or deeply corroded metal be saved with this method?
It depends. Electrolysis removes rust very effectively, but it doesn’t replace missing metal. If the corrosion has eaten deep pits into the surface or thinned the metal significantly, you’ll be left with clean pits and thin sections; the rust will be gone but the damage remains. For structural components or precision parts, this might mean the piece is still unusable even after cleaning. For decorative items or tools where some surface imperfection is acceptable, cleaning away the rust reveals what you’re actually working with. Sometimes what looked terrible turns out to be mostly surface rust on sound metal; other times you discover the corrosion went deeper than you thought. Electrolysis shows you the truth – whether that’s salvageable depends on the item’s purpose.
How does electrolysis compare to using acid for rust removal?
Both methods work well but through entirely different mechanisms, and each has distinct advantages depending on what you’re trying to achieve.
Acid rust removal uses a chemical reaction to dissolve the iron oxide. Products like phosphoric acid (found in naval jelly), citric acid, or white vinegar react with the rust and convert it into a compound that either dissolves in the solution or can be wiped away. The process is straightforward (submerge the rusty item in acid or apply it to the surface, wait for the chemical reaction to complete, then clean off the residue). Stronger acids work faster; weaker ones like vinegar take longer but are safer to handle. The key advantage is simplicity.
However, acids have significant drawbacks. They attack the base metal underneath if you leave items submerged too long, particularly with stronger acids. Acids also struggle with heavy, thick rust because they work from the outside in and can take days to penetrate deep corrosion. If you’re working with complex shapes or assembled items, the acid can seep into joints and crevices where it’s difficult to rinse out completely, potentially causing problems later. Disposal is more problematic than spent electrolyte, particularly with stronger acids.
Because electrolysis is not a chemical attack, it won’t harm the base metal regardless of how long you leave it running, making it much safer for delicate or thin items. Electrolysis works on recesses, threads, and complex shapes that would be difficult to clean mechanically, and it handles heavy corrosion more effectively than acid because it works through the entire rust layer. It won’t remove engravings or other delicate details.
The disadvantages of electrolysis are that you’ll need some basic equipment and a place to leave it working. It only works on ferrous metals (those that contain iron as its main component), whereas acids can clean rust from a wider variety of materials. And if you set it up incorrectly (reversed polarity, wrong anode material), you could damage your item or create safety hazards.
For light rust on small items, acid might be more practical. It’s quick, requires no special equipment, and you can do it in a jar on your workbench. For heavy corrosion, large items, or things with intricate shapes and threads, electrolysis is generally superior. If you’re restoring valuable or delicate pieces where you can’t risk over-cleaning or etching the base metal, electrolysis is the safer choice.