
If you’re working with a really beautiful piece of wood, you’re unlikely to want to change its colour. But there are lots of situations where changing the tone of a piece of wood is really useful, and that’s where stain comes in. Commercial, mass-produced stains are reliable, but they have a fixed palette and contain VOCs that aren’t good for our living environments.
Homemade stains made with common household ingredients can often produce similar results to commercial stains for a fraction of the price. You can experiment, layer different ingredients, and try different pre-treatments and mordants to produce an endless range of beautiful colours. Finish off with an oil, wax, or varnish as needed.
1. How to stain wood with coffee
- Brew a strong pot of coffee using whatever your usual machine is. If you’re not a coffee drinker, a jug is fine (just strain once brewed).
- Allow to cool, then apply liberally with a brush.
- Allow it to sit for at least 10 minutes and then wipe off.
You can also make a stain with tea (make a strong infusion and leave it to cool, just like with the coffee stain); I haven’t included it as a separate recipe as coffee will get a deeper and richer result.
2. How to stain wood with onion peel
Onion peels make a multi-surface dye and will produce a pretty amber stain on certain woods.
- Place onion peels in a saucepan and cover with boiling water.
- Simmer for an hour, topping up the water if it falls below the level of the onion.
- Remove from the heat and strain.
- Apply with a brush once cooled.
In my tests, I found that onion skin had the palest colour (photos below to give you an idea). It could be that my onion skin stain was too weak, so I plan to do further tests with the liquid reduced down to a much more concentrated form.
3. How to stain wood with iron acetate
If you soak steel wool in vinegar, the acetic acid slowly dissolves the iron, forming iron acetate. When applied to wood, the iron ions bond with the tannins naturally present in the timber, producing a dark tone (depending on dilution). This technique has been used by furniture makers for generations to fake the look of ebony without the expense (hence the name for this technique – ebonising).
- Pack fine steel wool (grade 000 or 0000) loosely into a glass or plastic jar (don’t use metal containers, as they will react with the vinegar).
- Cover completely with pickling vinegar or household (sometimes called ‘white’) vinegar.
- Leave the lid on loosely (the reaction releases a little hydrogen gas) and let it sit for a week or so, agitating occasionally.
- Once the liquid has become black, strain through a cheesecloth or coffee filter into a clean container.
- Dilute with additional vinegar if needed (do some tests to see how your mixture reacts with your wood)
- Apply evenly with a brush.
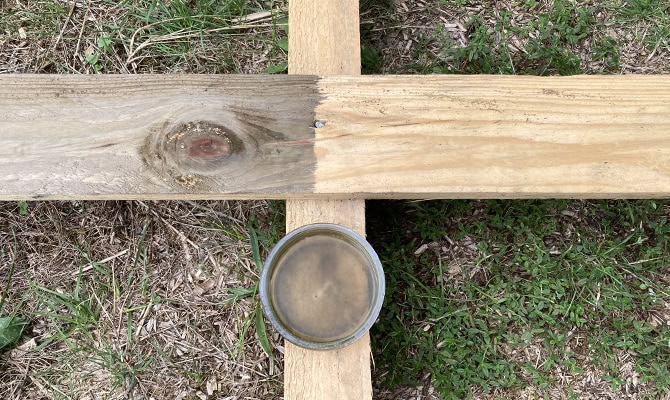
This stain relies on a reaction, not a pigment, so the colour of your iron acetate solution is not a guide to what the final colour will be. As you paint the solution on, it can take a moment or two to see the reaction, so you need to pay attention to where you’re brushing. The colour will keep developing over the first few minutes and then really deepen as the stain dries (as the surface dries and is exposed to air, some ongoing oxidation of the iron continues, which can deepen the tone further). For this reason, always wait until the next day before deciding if further coats are needed.
Any leftover steel wool can be kept to make a new batch with fresh vinegar. Iron acetate can be stored for months (I have a jar that is years old) if kept sealed and out of direct sunlight.
You can use a strong tea solution as a tannin pre-treatment for woods like pine or maple that don’t have enough natural tannin to react well to your main stain. Do some tests first on scraps of the same wood to see what the end results are.
Testing homemade wood stains
It’s always worth testing the stain first. Different woods give different results, and stronger solutions can have a deeper or darker colour. You might also want to try adding more than just one coat.
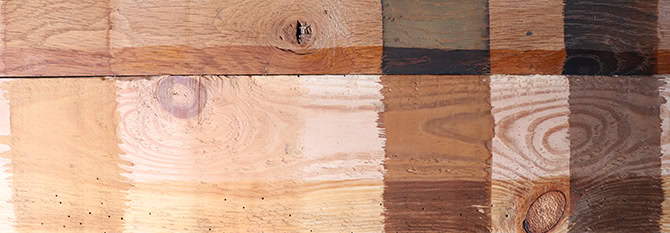
I tried the three recipes above on two pieces of wood, as pictured below. The top piece is a planed piece of oak, and below it is a roughly sanded piece of pine. I applied the following stains left to right: coffee stain, onion skin stain, iron acetate, and a 3:1 diluted iron acetate solution (diluted with vinegar). I applied the coffee and onion skin solution liberally. Once the patches were dry, I also applied a strip of linseed oil across the bottom to see how the colour changed. As you can see, the onion skin is by far the palest in this test, but you could have reduced the liquid to make it much stronger.
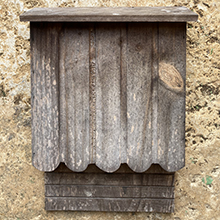
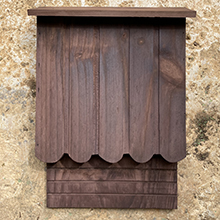
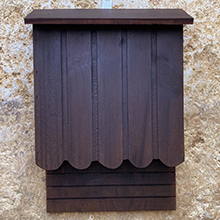
The images below show a weather-beaten bat box (l-r) before staining, after staining with iron acetate, and then after protection with linseed oil.
Notes about staining wood
Applying these kinds of water-based stains can cause an effect called grain raising, where the wood fibres swell and stand up, roughening the surface as it dries. This is less likely to happen with dense, closed-grain hardwoods like walnut, mahogany, and ebony or oily/resinous woods like teak and rosewood. But it can happen with softwoods generally (like pine, fir, spruce), poplar, alder, lime (basswood), some oaks, soft maple, and cherry.
To avoid this issue, pre-raise the grain deliberately by wiping the wood with plain water first, letting it dry, then sanding with fine-grit paper before the staining stage. This allows the fibres to swell and be cut off, so the second application (the stain) doesn’t raise them again.
Frequently asked questions (FAQ)
What's the difference between homemade wood stain and commercial products?
There are lots of unknowns when you purchase a mass-produced tin of paint, stain, or varnish. One issue with even simple commercial stains is that they can contain petroleum-derived drying oils, resins, and solvents. When you make your wood stain yourself, you know exactly what’s in it. Homemade stains may be a bit more experimental, but the fact that their results are more variable can lead to more creative applications. I’d argue that the infinite palette of results you can achieve is, in itself, part of the fun of using them.
Some pros and cons of household stains are listed below.
Pros:
- Commercial oil-based stains are flammable and require ventilation, whereas these homemade recipes are water-based and don’t produce solvent fumes, so they are safe to use indoors without a respirator.
- These stains react with the wood, rather than sitting on top of it. Because it’s a reactive finish, it penetrates deeper into the wood than many stains or dyes, producing colour from within the fibres rather than a surface film – which is why it doesn’t chip or flake the same way a pigmented coating can.
- Homemade stains don’t tend to go patchy the way oil-based store stains do, since there’s no pigment sitting unevenly on porous vs dense grain.
- Homemade stains are cheap and non-toxic (in the case of iron acetate, basic precautions are required during application, but it is non-toxic once dry).
Cons:
- Commercial stains typically offer better UV protection, water resistance, and wear resistance to homemade solutions.
- Commercial stains are formulated to a fixed recipe, so results are always the same; a DIY stain’s colour can vary noticeably between batches or on different woods.
- Commercial stains work on anything regardless of species; homemade stains work on tannin-containing wood (unless you include a pre-treatment step).
Can iron acetate be used to stain other surfaces or materials?
Yes. Iron acetate solution is sometimes called ‘vinegaroon’ outside of woodworking circles, where it is used to dye vegetable-tanned leather or natural fabrics like cotton. It’s cheap, safe with basic precautions, and endlessly tweakable – species, soak time, and tannin pre-treatment all affect the final shade, so testing on an offcut first is essential.
Iron acetate won’t stain tannin-free materials like plastic or most synthetic fabrics.
Can onion skin be used to stain other surfaces or materials?
Yes. Onion skins are great for dyeing wool and silk, giving shades of gold, amber, pink, and rosy brown, and have been used in Turkish rug-making for generations. Cotton and linen can take the dye too, but the outcome depends on preparation – used alone, the onion skin’s own tannin can produce workable colour on its own; adding alum as a mordant gives deeper, more colourfast results.
Onion skins are also the classic base for naturally dyed Easter eggs, giving shells a reddish-brown or mottled tint. They’re also used on paper and card for a soft, aged, parchment-like tint. Recent research has even used onion skin extract to dye cellulose nanofibre sheets, where it worked as a UV-blocking coating.
Can you use mordants to change the results of a homemade wood stain?
Yes. Mordants (substances to help a dye or stain bond more strongly and permanently) are applied after the base stain to shift or deepen the colour, and a few are well documented specifically for wood:
- Alum: colour-neutral, mainly locks colour in rather than changing it
- Iron (ferrous sulphate, or the vinegar-and-steel-wool solution): darkens toward black or grey depending on the wood’s tannin content; a tannic-acid base finished with an iron topcoat gives a strong black
- Copper: shifts tone toward green
- Potassium dichromate: produces honey-orange through purple depending on concentration, though it’s genuinely toxic and needs far more caution than alum or iron